skip to main |
skip to sidebar
Backburner is great! It allows you to assign rendering jobs to idle machines and have them process your work. This frees you and your computer up to keep working on other tasks. I've also found that a render job submitted through Backburner uses less memory than one rendered locally. This is because the application of Max launched by Backburner doesn't have a bunch of "undo's" to remember and depending on the configuration, it won't use up memory with the frame buffer.
Backburner has its weaknesses as well. For example, if you are rendering on a headless machine or one on the other side of the office you have no idea how much progress has been made on a single frame...that's kind of a bummer. Its also a pain to go around, login to machines and start the Backburner manager, and start the Backburner server. You can put shortcuts to the respective application in the startup folder of each computer but this means that the machine has to be logged in which isn't difficult but its a pain.
The smart thing to do is to install Backburner as a service which will run as soon as windows boots. This is great for your headless machines and you have very little worry that a user might say "Backburner? what the heck is that?" and delete from the startup menu. If a user knows how to go in and kill a service this person is a nerd and is likely already a part of your team (in which case he or she wouldn't want to kill the service).
As you probably already know, Backburner relies on a server application and a manager application. The manager application manages the jobs and the server application executes the jobs. I like to run the manager on a machine that will not take part in the rendering just in case the render job crashes a machine (I run it on my file server). Both applications can be run as services and the installation process is basically the same. Before you install the server service or the manager service you need to make sure that each application is configured correctly.
For manager go to:
start - applications - Autodesk - Backburner - manager
When it fires up, you'll see something like this:
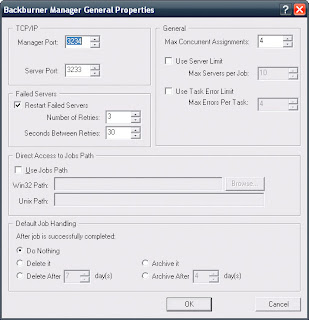
I've never found any reason to change these settings but you might. Make note of the Manager and Server ports, if you have a pesky firewall you might need to open them up. Go ahead and hit ok. Now the Backburner manager is running.
Let's leave manager running and configure the server.
Start - applications - Autodesk - Backburner - server
You'll see something like this:
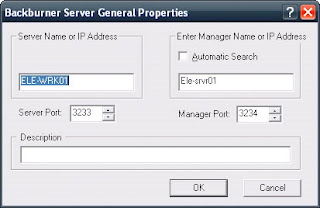
I like to resolve the connection to my Manager using the machine name, in this case "Ele-srvr01" you can use IP address or "Automatic Search" if you like. IP address is a bad idea if your addresses are assigned dynamically and "Automatic Search" is a bad idea if you are on a large network with multiple subnets. Machine name works well in most environments provided that you intend to always run the manager on the same machine (which I do). Filling in a description is a good idea if you are on a large network and have access to lots of machines. In those cases, I'll enter the name of the person who works on that machine (easier to remember than some weirdo computer name that you IT staff created). Go ahead and hit "ok". Now your server is running and it will look like this:
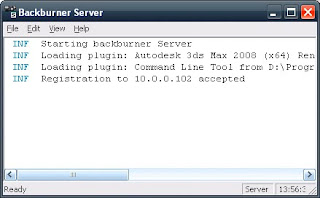
You want to look for the line which reads "Registration to accepted". This means you are connecting just fine. If you don't connect, I'd suspect that a firewall is blocking connections. Temporarily disable the firewall(s) to verify. Once you've connected successfully, go ahead and shut down the server application.
Now to install the server service you need to open a command prompt. Start - run - type in "cmd" A command prompt will open. You can install the service by following the steps that you see below. Please note, my Backburner is installed at d:\Program Files (x86)\Autodesk\Backburner\ yours may not be...you'll have to find it.
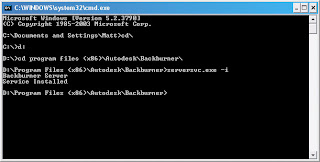
As you can see I've received a message which indicates that the Backburner Server Service has been installed.
The manager service installs in exactly the same way. Should you find that you need to uninstall the service replace "-i" with "-r" (install, remove). The next step is to get these services running under a user account with sufficient privileges to access the network, which is critical. I'll cover this in my next post (which is all ready to go).
It seems like a lot of users have difficulty getting distributed rendering or net rendering to work properly. The promise of either is terrific, take advantage of unused CPUs to get your rendering done faster or offload the task to another machine altogether ( freeing up your workstation for other tasks). However, the setup can be a little tricky. In most cases this is because of user rights as they apply to services on your slave machines.
Let's talk about services. Services are applications which run in the background of your machine. The startup of services can be configured so that they run automatically. Windows runs a ton of services by default and programs like your antivirus software will install a few too. Mental Ray Raysat and V-Ray Spawner will both also install as services. Backburner does not but you can install it as one.
Now I think that I should explain user accounts. When you login to your computer you have a user account. If it's your personal PC its probably just something like "Matt" if you are in an office environment in might be something like "Matt@domain_name.com". Either way, when you have logged in the computer says "hey, I know you, and I know what you are allowed to do on this computer" so you get to work and everything is fine.
Let's say you connect to a file server. In your office, I guarantee the file server is setup to only allow connections from users it knows. So when "Matt" tries to access a network drive the file server says "welcome aboard buddy! I've been told to let you access, read & write these files" and you go about your merry way. At home, you may have setup sharing permissions or you may have allowed anyone and everyone full access to the drive. Personally, my file server only allows people it knows to access.
Either way, you can access all the files you need. But when you try to use distributed rendering or you render to a machine via Backburner you get all kinds of errors. This is because the services are not running as "Matt" or "Matt@domain_name.com", they run as "Local System". Your file server gets a request from "Local System" and says "I don't know you so bugger off!"
Basically, what we need to do is to get the service to run as "Matt", "Matt@domain_name.com" or some other account with privileges to access the file server. You'll want to talk to your IT staff about that last one, they may just have you use your account or they may want to create one specifically for this task.
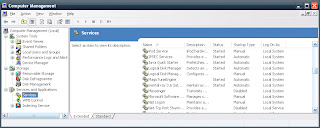
Access the services by right clicking on My Computer and select "manage"
From the Computer Management Console, expand "Services and Applications"
Select "Services" you should see something that looks like this:
In this case, you'll see that I've already located "mental ray 3.6 Satellite..."
Double click the service name and the properties will display.
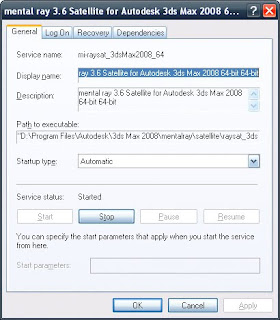
You can see that the service startup type is set to "Automatic" and that it is currently running. Click on the "Log On" tab.
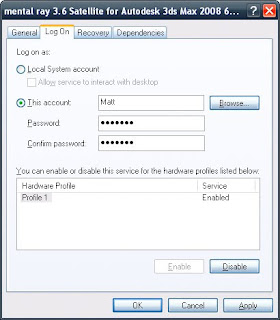
By default you will find "Local System account" checked.
Change this to "This account"
Enter a username with admin rights and access to the file server (in this case "Matt" has those rights).
Enter the password information
Hit "OK" - windows will then tell you that the account "has been granted the Log On As A Service right" and then tell you to stop and restart the service (hit "ok")
Double click on the service name again.
In the general properties tab, hit "stop" - windows will tell you that it is stopping the service
Now hit "start" - windows will tell you that it is starting the service
If all of the user information you entered was correct you should be all set. The information provided here is directed towards Mental Ray Raysat but it works exactly the same way for V-Ray Spawner and Backburner Manager/Server.
In my last post, I sort of skipped over any efforts to add variation to leaves my tress process. Today, I'll show you how to do this in Mental Ray, and follow up with how to do it in V-Ray (which is much easier IMHO).
Lets start off with a look at the previous rendering.

Not bad huh?
Most xfrog plants that you come across will use a multi/sub-object material which has the same leaf or bark textures applied to various channels. In order to keep things simple, I corrected one material and instanced it throughout the map channels. This is fast and easy but it means that all of your leaves will look the same. What I want to do now is to de-instance those materials and add a little variety to each material. Generally speaking, I think this is kind of a pain in rear but it's probably worth it.
I've seen tutorials which suggest that you open your diffuse map in Photoshop, tweak the color, save as option b, c, etc. repeating as many times as you like. I guess that's all fine and well but it means that you have more maps saved to disk and you have more maps to load into memory. I'll suggest a method that relies on one instanced map (but may not give you all the control you'd get by tweaking in photoshop).
We're going to use an RGB tint map to affect the color of our leaves. We'll use this map type on all of our leaf textures so while the leaf materials are still instanced apply the RGB map to your diffuse texture (be sure to "keep old map as sub map").
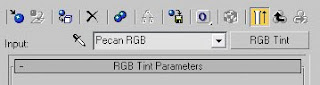
At this point, if we go though and make all of our leaf materials unique we can begin to add variation to the leaf color By tweaking the RGB tint map.
When we made all of our materials unique we broke the instance that occurred between each of the maps. Mental Ray will now load the diffuse, bump and opacity textures into memory six times each. Its not a big deal in this scene (15.72 meg vs. 2.62 meg) but if I'm working on something much more complicated where memory limitation can become a problem, I want to be sure that I'm being efficient with my maps. So I'll run the "Instance Duplicate Maps..." utility found in the material editor.
 NOW we can go and tweak the RGB tint map to add color variation. I'd recommend that you try something more subtle. For example: pull 20 points out of the red on one leaf, 20 points out of the green on another, 20 points out of the blue and then make some combinations where you take a few points out of mutiple colors.
At this point we may or may not be done. Let's say that your xfrog has five leaf materials and you've gone through and tweaked the color of each. You might find that you get an uneven distribution of leaf colors. This is because the material IDs are not evenly distributed through the leaf geometry. Luckily, I found a handly little script that will take care of this problem.
Michael Quist wrote a unique random material ID generator script. What makes it unique is that you can specify a start and finish range for the IDs. Most of the other scripts I have found generate a unique ID for every element for as many elements as there are in the model. With Michael's script I can still apply my multi/subobject material to the leaves and not worry about the bark textures being applied to them.
You can get Michael's script here:
http://www.3idee.nl/3d/html/layout.php
Before you run the random ID script you are going to need to detach all of the leaves from the tree model. This way the script won't change the IDs for the trunk, branches, etc. Once you've run the script you can reattach the leaves to the tree model.
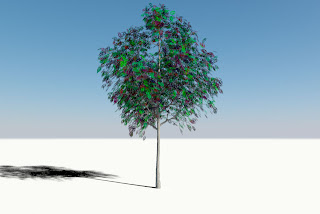
So what does all of this look like? To illustrate the amount of variation we have achieved I created the render below using some pretty wacky colors.
And now something more subtle:
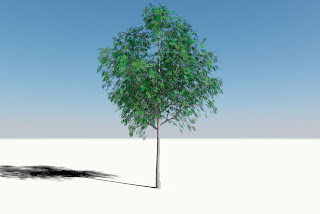
For this particular tree I didn't think it was appropriate to have dramatic differences in color. I don't think you'd really see that from a real tree during the spring or summer. If you were working on an autumn tree you might want to pump it up a little. In addition, I think that the benefits of this process will be more readily realized if you are working on a project where you have multiple plantings of the same type of tree.
I'm not nuts about this process. Its much easier in V-Ray (post coming soon) because of some simple, free plugins that will randomize color values. I really, really wish I could find something similar for MR but there doesn't seem to be an option.
There are a handful of good tree tutorials around, both for Mental Ray and for V-Ray. I don't want to spend a ton of time re-hashing already available information so I'll point you to a tutorial that I have referenced several times and then provide my comments or additions to the process which I feel is a little more production ready.
Jeff Patton, Mental Ray guru extraordinaire (and one of the most helpful people I've ever run into) has a terrific tutorial on preparing trees to render in Mental Ray. Read it here:
http://www.mrmaterials.com/jeffs-blog/103-faster-foliage-renders.html
Following these steps you'll get some beautiful renders of your trees quickly. This is because Jeff advocates turning off the cutout map and controlling the diffuse color for final gather calculation, locking the final gather map and rendering with the cutout map turned back on.
I think that this is a reasonable process but as the number of plant types go up, the process of disabling the cutout map, generating final gather then re-enabling the cutout map becomes a bit laborious (IMHO) and if you're in a rush (which who isn't by time to render?) its easy to forget to enable a map or two. So let me show you what I like to do which might be a bit more time consuming on the front end but (I believe) will save you an "oh, crap!" moment on the back end.
I've started out with an xfrog pecan tree (young). I don't have the rights to distribute the model but you can get it from the Autodesk site mentioned in Jeff's post. Initially, render time is terrible. I had a couple of quad cores working the job, it took 9m 11s and the resulting image looks like this:
We're getting killed on render time because of the cutout maps. Mental Ray, V-Ray, they all hate them. Disabling the cutout map drops my render time to 0m 39s!
Obviously, this doesn't look too good either. However, we can see that we need to do something about the cutout maps because they are having a dramatic effect on render time. The reason the cutout maps are soooo slow is because of the bitmap blurring. As maps get farther from the camera, or the viewing angle becomes more acute max will blur bitmaps to help reduce aliasing effects. Blurring a bitmap that is used to control opacity wreaks havoc for the renderer.
 Go into your material editor, select your cutout map, and set the blur value as low as it can go (right click on the spinner and max will set it to the lowest possible value), hit render, and you'll get something like this (which rendered in 3m 24s)
 better? maybe not. We've got some other problems that we need to deal with. First of all, in an xfrog plant the diffuse, and opacity maps are linked and our diffuse map no longer benefits from the bitmap blurring. Its tough to see in this example, but you'll end up with a highly aliased diffuse texture We need to de-instance the diffuse and cut out maps and set bitmap blurring to 1.0 on the diffuse map. Which gives us this:
Now we're getting dark ringing around all of our leaves. This is because of the the unblurred cutout map doesn't line up exactly with the blurred diffuse map. In addition, final gather takes the bitmap background color into account when generating the bounced light. In this particular map, that color is black. So we aren't really even benefiting from the final gather bounces.
Its time to make some new textures. This is really a piece of cake.
Open your diffuse texture in Photoshop. - Take a color sample from one of the leaves. - Create a new background layer and fill it with the color value. - Flatten the image. - Check to make sure there is no alpha channel (in the diffuse slot it does you no good and it just takes up space on disk and in memory) - Save as a tif, I'll typically use the original name with "_MR" added to it (don't use LZW compression, Mental Ray doesn't like it).
I like to make note of the RGB value that I used for my background layer and then use that in the diffuse color slot. It won't affect final gather but it will make your leaves green in the viewport (and it kind of looks prettier that way).
At this point, I figure its worth making a new cutout map as one we are using currently has RGB plus alpha data in it and all we need is the alpha info. The red, green, blue channels just represent additional space on disk and in memory.
- Open your cutout map in Photoshop.
- Create a new background layer and fill it with pure black
- Select your leaf layer and fill it with white
- Flatten your image Convert to grayscale
- Save as a tif, I'll name it with the original file name with "_MR_Cutout" added to it.
It seems silly to ignore the bump map, we can easily make a more effective map and again, the file we are currently using has more image data than we need.
 - Open your bump map in photoshop
- Create a new background layer and fill it with pure black.
- Select the leaf layer and open channel mixer.
Check "Monochrome"
- Play around with the sliders until you feel like you've emphasized the ridges in the leaf. (I feel like you want to increase the use of the green channel and reduce the use of the red and blue channels)
- You might want to tweak the brightness/contrast.
- Flatten the image Convert to grayscale
- Save as a tif, I'll name it with the original file name with "_MR_Bump" added to it.
Of course, you'll need to relink these textures to Max. Now hit render and see what you get...(I think you'll like it!)
Much, much better! Render time: 1m 5s!
I attribute the speed increases first off all to bitmap blurring but also to feeding MR smaller maps which only contain the image data it needs.
I think this process that I have presented seems time consuming, it really isn't. You can get one of these trees spiffed up and ready to go in about 5 minutes. If you create some photoshop actions, I think you could probably do it even quicker.
Undeniably the tree looks much better and renders much faster. This tutorial is geared towards Mental Ray but these tweaks work just as well for V-Ray.
I've got a few more tips up my sleeve which address adding some variation to the leaf color and the geometry itself. Stay tuned.


